This post is about screwing.
So, do you remember my last post about my new 144 year old moving fillister? Since the last time I showed her to you I've been a bad owner. I let her take a tumble from bench height, all the way to the concrete floor of the garage. With baited breath, I picked her up and examined for damage. I'll hand it to her, she's a tough old bird. The only wounds I saw were some cracking in the fence, which was worn thin from years of use anyway. I applied the liquid of life, glue in this case, and put a bandage of quarter sawn white oak over her weak section. For a few minutes it was touch and go, but she pulled through alright. I prescribed shelf rest for a couple of weeks whilst I was at work in England, and came home to find her good as new, or so I thought.
While I was gone, I bought this beauty off eBay.
All the original parts are present and accounted for, and now sharp and rust free. So when one gets a new toy, it is only fitting that they should play with it. After making grooves, dados, rabbets, and a match joint, I thought I would try a bead. The ole #45 did it's job admirably, and I was left with a nice bead, sunk into the material. I wanted to get a better look at the sides of the bead. I could have set the #45 up for a rabbet, and planed down the edges of the board that way, but my eye caught sight of my beautiful maiden fresh from rest on the shelf. I took her down, set the fence, which had mended well, and began to set the depth stop. That's when it happened. Under the pressure of the screw driver, the head of her adjustment screw split, undoubtedly weakened from the fall she had taken earlier.
After inspecting what remained of the screw, I was flabbergasted. Where was I going to find a suitable match for a 144 year old cast iron screw? The threads were deep and coarse. The head was made in a way not normally available on wood screws. I was screwed. I thought of welding the head, but knew that wouldn't last. I thought of finding a screw with the appropriate head shape, drilling out the current thread, plugging the hole and re-cutting the threads. This seemed like my only option, until I remembered something.
There are other craftsmen out there, who do what we do to wood, in other mediums. There are blacksmiths, machinist, glass makers, blowers and glaziers, weavers, seamstress, upholsterers, leather smiths, the list goes on and on.
I think in today's throw away society, we forget that we don't always have to fix what is broken or by an off the shelf replacement. There are hard working men and women, just like me and you, ready and willing to do the job at hand. Whether it's to make the fix you couldn't, or to make a custom replacement, they can take you places you could never get yourself. And maybe, just maybe, they can take you further than you ever realized you could go, all on the expertise they have in their chosen medium, just like you have in wood.
All of this to say, don't forget your fellow craftsmen. They are working hard to perfect their craft just like you are, and I am sure they would love your business.
Now, as a reader of my blog, I am sure you know that I am on a first name basis with a local machinist. If not refer to this post. He is always willing to impart his knowledge to me, and works cheap. That being said, I'm sure next time he needs a little wood work done, I'll be his first call. So here are some shots of the work to reproduce my screw in fine brass. Turns out his lathe didn't have the proper settings for a 9 thread per inch cut, so we used his CNC to get the job done.
And a gratis video of the CNC cutting threads.
As always, feel free to post any questions or comments in the section below. You could always contact me on Facebook or Twitter via the links on this page.
Until next time...
Search This Blog
29 July 2011
10 July 2011
eBay Issues
I have a minor problem with eBay. Having just slid down into its grasp, I'm not certain I can fight my way out. I went in search of mortise chisels, since I have yet to locate any around here. I have a 4 set of Marples that I sharpen at 30* for chopping, and a 6 set of Two Cherries that I sharpen at 25* for light chopping and paring. I have an unknown 2" wide 9" long chisel I sharpen at 20* for paring cuts only. I didn't have any pig stickers. Enter eBay purchase number one, the 1/4" English style handle mortise chisel.
A little TLC, a sharpening session, and some polish work on the brass, and she looks and works like this.
I added a strike button to the top for the mallet, but I need to redo it. The previous owner, as is normal for the time, had his name stamped once on the toe, once on the top, and twice on the heel, but when I took the fence off for cleaning and such, I got another surprise. There, in pencil, was his name and a date.
Mr. Isaac McPherson owned my new baby in 1867, 144 years ago. Looking up the maker of the iron confirms this story. I love to see a tool that is so old, still be fit as a fiddle, and ready for another 150 years of service.
Just so you don't think I forgot about the plow plane, I have a bid in on a Stanley #45.
I also completed the last lesson before the final for The Hand Tool School this week. And here she is in all her knotty Alder glory.
As always, feel free to post any questions or comments in the section below. You could always contact me on Facebook or Twitter via the links on this page.
Until next time...
I unwrapped her and gave her a quick sharpen, and a light bulb went on, it was the easiest mortise I had ever cut. Now I just need to find a 3/8" and a 1/2".
While I was on eBay, I decided to have a look at moving fillister and plow planes. Low and behold, what did I find but this beauty. Here she is straight out of the box.
I added a strike button to the top for the mallet, but I need to redo it. The previous owner, as is normal for the time, had his name stamped once on the toe, once on the top, and twice on the heel, but when I took the fence off for cleaning and such, I got another surprise. There, in pencil, was his name and a date.
Mr. Isaac McPherson owned my new baby in 1867, 144 years ago. Looking up the maker of the iron confirms this story. I love to see a tool that is so old, still be fit as a fiddle, and ready for another 150 years of service.
Just so you don't think I forgot about the plow plane, I have a bid in on a Stanley #45.
I also completed the last lesson before the final for The Hand Tool School this week. And here she is in all her knotty Alder glory.
As always, feel free to post any questions or comments in the section below. You could always contact me on Facebook or Twitter via the links on this page.
Until next time...
02 July 2011
A Few Odds and Ends
I've been working on a few housekeeping items lately. Firstly, my old woodie Try plane needed a new tote. She was missing hers when I bought her. I spent a couple of hours with a coping saw, files, and sand paper and had her back in top form in no time.
Next, I re-bedded the iron and then I made this great plane adjustment hammer/ mallet. I got the idea from the Logan Cabinet Shoppe podcast. Bob does such a great job of explaining traditional hand tools I highly recommend you follow his blog.
As the end of semester one at The Hand Tool School is drawing to a close for me, I have the big tool chest build looming in my near future. Looking at my tool collection, I really don't want to cut all of the rabbets, dados, and groves with a saw and chisel. Looking at my budget and the market, I can see some rehabs of woodie plows, fillisters, etc in my near future. Since the "Wubby Cubby" is now finished, I only have one project left till I need to tackle the tool chest. Wish me luck.
As always, feel free to post any questions or comments in the section below. You could always contact me on Facebook or Twitter via the links on this page.
Until next time...
30 June 2011
3 Marking Knives for $1.09
About 10 years ago, I joined the United States Navy. I was engaged to be married at the time. While in training in San Diego, CA, I flew home at Christmas time and tied the knot with my wonderful wife and flew back to San Diego. Two months later, I had rented an apartment and my bride flew out to meet me. Our entire household goods were contained in the two suitcases she brought with her. Needless to say, we had to purcase a lot. Being a military income meant we had to buy it cheap. One of the many things we picked up was a set of four "steak knives" at the everything's a dollar type store. These were our knives for about a year until we bought a nicer set and they got pushed to the back of the drawer.
Nine years and five houses later, there is only one left. My wife gave it to me as a "shop knife" so that it was out of her kitchen. About six months ago, I found it kicking around out in the shop and decided I didn't need a shop knife, but I did need a spear point marking knife. I had purchased a right handed marking knife from a store a few months prior, and I have to say I wasn't completly pleased with it. It didn't hold an edge very well, and the whole handed thing was a pain in the neck. After using my shop made one for about six months, it is the marking knife I always reach for, even for opening packages, cutting string, etc.
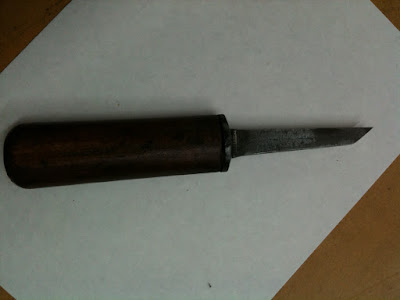
I decided to spend a whole $1.09 to buy another pack of knives to demonstrate the process to y'all. What follows is a slide show of that process. It is pretty simple. Just make sure to quench your steel to keep it from over heating. As you can see in the last shot, my original still has its plastic handle, but it doesn't take much to make a handle. All told, for the three I made today, it took a total of three hours fifteen minutes. Enjoy.
As always, feel free to post any questions or comments in the section below. You could always contact me on Facebook or Twitter via the links on this page.
Until next time....
18 April 2011
My New Aquisitions
The last three weeks I was able to get my hands on some new old tools so I thought I would share with all of you. I spent the last few weeks working out of my office in Los Angles, which allows me to hit up the big city swap meets on the weekends. The first weekend, I ran across this beast and for the lowly sum of $20 I purchased a piece of history. Last made in 1917, the #29 Stanley transitional fore plane.
Next up I went to a OSH hardware store and picked up a 1/4" bit for my brace. My brace and bit set was an auction find, and the "bit set" leaves a lot to be desired, most notably the #4. Irwin, new in the package $15.
Second up that weekend was a nice Stanley #25 10" sliding bevel gauge. I have been looking for something to replace my new hardware store Stanley wing nut style gauge. I couldn't get it to lock down good enough for my liking, causing me to break off the wing nut wings with pliers. This wasn't so bad since they always seemed to be in the way anyhow, but needless to say it was time for an upgrade, and for $10 who could say no.
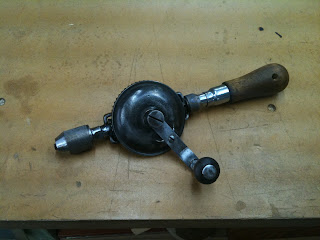
The following weekend netted Yankee #1530 egg beater drill, again for $10. I've wanted an egg beater for a while now, mainly for screw pilot holes and the like.
Next up I went to a OSH hardware store and picked up a 1/4" bit for my brace. My brace and bit set was an auction find, and the "bit set" leaves a lot to be desired, most notably the #4. Irwin, new in the package $15.
I thought I had done well. Went to the "big city" swap meets, got some really good user tools at a reasonable price. Little did I know that my wife, here in the middle of Red Dirt Oklahoma, at a garage sale, for the princely sum of $1 would come across this and decide to pick it up for me. Here for your tool viewing pleasure, is the Henry Disston D-8. 26" 5 1/2 tpi rip, with the thumb hole.
You will notice that, on all of the old tools, I didn't try to keep the patina or the original finish. I didn't strive to restore them to like new condition. I'm not a collector, I'm a user. I strive to restore them back to a condition that they work like when they were new. This I have achieved. The plane takes beautiful thick chips, and the D-8 sings through thick rip cuts, just as they were designed.
As always feel free to post any questions or comments in the section below. You could always contact me on Facebook or Twitter via the links on this page.
Until next time....
Until next time....
27 March 2011
Been Busy
When we left off last time I was plodding along on the Hand Tool School lessons. I am still. I am only two and a half lessons behind now. First there were the Bench Hooks
Then the chisel storage, I needed to get these Two Cherries out of their box anyhow.
Then the miter box. 90* is dead on the two 45*'s though, well close enough for the next project.....
The miter shooting board. This one came out dead on.
Then there was the layout square done with half laps. It is as accurate or maybe even a little more accurate than my framing square.
Then the shop bent was made using M&T joints. Possibly the squarest piece I have ever built. Love the way it came out.
The next lesson was a stone pond. I don't have any pictures because I didn't make one. I did a few practice joints, but I don't use water stones, and if and when I do, I am going to make a Frank Klausz style stone pond. The one featured on his Hand Tools DVD that my wife got me for Christmas.
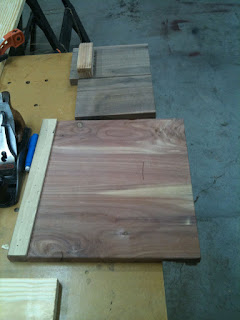
So that brings me to the current project, the saw till. I am in the panel make up and stock prep phase of that one. I am using Radiata Pine instead of some nice hard wood like "White Oak" wink wink. For one I can afford it. Two, if you look at almost all of my pictures above, you will see I use poplar for most of my shop stuff. My lumber supplier that is close by, (HD aka the Borg) doesn't carry 1x12 poplar. My real lumber supplier is about 80 miles away. I figured if I was going to glue up panels anyhow, I might as well use something a little lighter on the budget and in my opinion better looking. Some of the boards even show a little curl.
Sorry wrong curls.
Of course, now that I'm in full swing on the saw till, it's time to go to work. You know, the one that currently pays the bills, and by the time I get home (2-3 weeks) it will be lawn care time, does the cycle ever end?
As always feel free to post any questions or comments in the section below. You could always contact me on Facebook or Twitter via the links on this page.
Until next time....
Subscribe to:
Posts (Atom)